Jeep Underglow

The end goal of this project was to give my friends jeep RGB underglow. It took 5 months, sometimes working as late as 11:30pm with flashlights, and when it was 26° and snowing. Now that we are finally almost done with this second iteration I figured it would be a good time to post about it.
The first iteration was relatively simple. Buy some waterproof LED strips, epoxy them under the jeep, run the wires to some switches in the cabin, and be done with it. This is pretty much exactly what we did.
We quickly realized that while this setup looked good at first, it was wholly inadequate. The LED strips were not actually waterproof, and had a common positive, so whenever they got wet (which was a lot, this was new england in January) they would faintly glow whatever color happened to be connected to the common by the water. Another smaller issue was that because we were switching grounds, there was no way to make the lights in the switches turn on. This first version lasted about two days before totally losing functionality and starting to smoke, so we disconnected it from the battery and decided to wait for warmer weather for the next version.
For the second iteration the three main issues we decided to focus on fixing were making the strips totally waterproof, only having the common positive connected when the strips were actually being used, and lastly making the lights on the switches in the cabin light up. We also decided to add some waterproof connectors and attach the strips with magnets so they could be taken off if needed.
To make the strips waterproof, we totally encased them in polyester resin. We started with some aluminum U channels, and added a spacer to get the strips right to the top of the channel for maximum light diffusion. Then we added the leds and wiring at one end, and blocked off the ends of the channel with hot glue and popsicle sticks to keep the resin from pouring out the ends as it cured. Finally, we poured the resin (mostly into the channel). Turns out polyester casting resin smells awful. We had to move theses new aluminum and resin light bars out of the garage to outside under a car to cure because they were stinking up the whole house with very toxic fumes.
Side note: even if your resin says it’s safe to use with good ventilation, don’t believe it if you look at the MSDS and see that it has an inhalation toxicity of 4. Seriously how do they think that’s even remotely safe?…
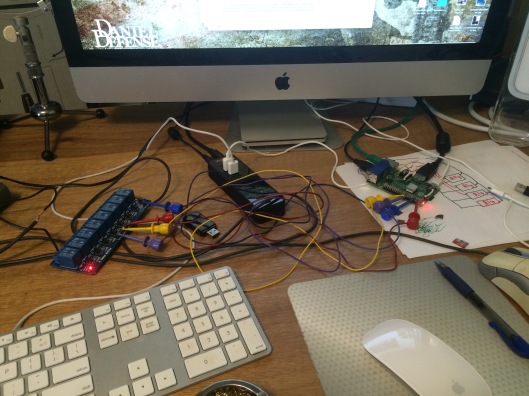
To solve the problems of the common positive always being on and the switches not lighting up, we figured out a relatively simple relay setup. There’s one relay for each color that connects the ground for that color when the corresponding switch in the cabin is thrown, and one relay for the common positive that turns on whenever any of the other relays are activated.
Finally we put everything together, soldered a ton of stuff, epoxied all the electrical joints to make them waterproof, and stuffed it all into/under the jeep.  We flipped a switch. Aaaaaaaaaaaaand…
Nothing happened.
In a mad rush to finish everything in time to get to a concert, I have mixed up 2 wires under the hood, and the strips were getting no power. However, after we got back from the concert it didn’t take long to figure out what was the problem, and about half an hour later we got everything working!
IMG_0454
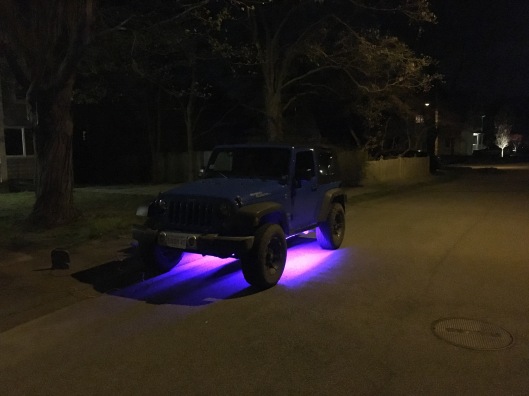
All the colors work, the switches light up, the magnets hold the strips to the frame really well, and I’d be willing to bet that this version is waterproof to the point of submersibility.
I have a bunch of pictures from the process and of the final product, but wordpress is making it really hard to fit them into the format, so there will be in an imgur album soon, I’ll edit in the link when it exists.
Thanks for reading, I hope you found the project interesting!

Raspberry Pi Intranet Relay Control

Continuing on my quest to control everything in my house from a phone or computer, over the last few days I’ve been working on controlling relays over my home network with a raspberry pi. I stumbled upon a really great framework for controlling the pi’s GPIO pins through the web called WebIOPi. It makes it very easy to serve a web app off the pi to control or see input from the pins, as well as providing an easy way to do the same in locally run python scripts.

First I set up a fresh install of raspbian, then just followed the installation instructions provided on the WebIOPi website. I used a model 2 pi, so I also had to use this patch to change the memory mapping.

It’s always fun to really be able to see your project work, so instead of being satisfied hearing the relay click on and off, I connected it to some LED strips I stuck in my radiators.IMG_0216

The wiring was very cleanIMG_0215

I also wrote some bash scripts to make it easier to start and stop the whole program, as well as making it automatically initialize at startup.IMG_0217

In the end, I can now turn my radiators red from my phone. Not the most useful project, but it looks pretty cool and I gained a lot of experience in stuff I had never done before. Next step is to build a nicer controller app more specific to my room, and put more things under the pi’s control.

RasPi Owncloud Server

Tags

, ,

I haven’t done much with Raspberry Pi before, and after an underwhelming attempt at controlling stuff over the internet with an Arduino ethernet shield, I decided to do a project to force myself to learn more about using a Pi. The project I went with was setting up an Owncloud Server. Owncloud is basically a free dropbox clone that you can run on your own server. This means that not only do you know exactly where your data is stored, and what security measures are taken to protect it, but you can attach external storage to give yourself terabytes of cloud storage with no huge monthly fee. There are desktop clients for windows, linux, and osx, as well as clients for ios and android. Overall it’s some pretty cool software, and really easy to set up with some basic bash knowledge. I got help from raspberrypi.org as well as projpi.com. I used a RasPi B+, but I would recommend a 2B, because I was constantly maxing out the cpu even at the turbo overclock preset.

IMG_0884

Timed Light

Tags

,

I needed timed control over a high powered led, so in my typical overkill fashion instead of just using a simple timer switch, I decided to use an arduino. The overall system consists of 3 parts. A box with the arduino and LED driver, a lightswitch, and an LED mounted on an outrageously large heatsink.IMG_0842

The sketch checks if the switch is on, and while it is, keeps the light on for an hour. After that hour, if the switch hasn’t been switched off (that starts the process over) it dims the light for 5 seconds, then shuts it off. I gave it a 5 second buffer so if one were still in the room they would have time to get back to the switch before the room plunged into darkness.

The one major quirk was that the LED driver I was using needs the opposite of what you would think to turn the led on and off. 5 volts to turn the led off, and 0 volts for fully on. If you look at the code, since I figured that would not be the case for most lights, I added a variable you can change to either have 5 volts be on or off for the led/light controller.

The other major nuisance was that the LED got really hot, really fast. I didn’t have much time, so I just threw the smallest heatsink I had that could handle the heat on the led.

IMG_0844

Nerf Gun Mod

Tags

I recently got a good deal on 2 nerf longstrike cs-6s, so I am going to try to make one select-fire. In the mean time however, I found the adjustable stock pretty inadequate. It is either all the way out:

IMG_0696

or all the way in:

IMG_0695

When it is out, it has a good length of pull, but is longer than it needs to be. When it is in, you can’t get you hand on the grip very comfortably. To over come this, I dismantled the blaster, and found that what locks the stock into those two positions is just a hole drilled into the back of the blaster that a little tab pops into. All you need to do to fix the problem is drill another hole of the same diameter in between the existing ones:

IMG_0697

you then have a shorter length of pull but enough room for your trigger hand:

IMG_0698

Homemade high power nerf gun

Tags

This is a project I have actually been working on for a while now, but since I finally started this blog I figured I should start posting about it. The original goal was to make the highest powered and most accurate nerf gun that I could. I realized that because I was using nerf darts, the accuracy part was out the window, so i just went with highest power. In its current configuration, with the compressor I have access to, it can shoot a dart through 10 layers of corrugated cardboard and a heavy duty sheet. This is at 150 psi. the valves I am using are rated up to 600 psi, and most of the tubing is rated to around 3,500 psi. I am hoping to soon get a paintball co2 tank and regulator so I can find out the guns full potential. My new goal is to make a nerf dart break the sound barrier.

IMG_3898